Monthly Archives: February 2018

Replacing Cloudmqtt broker with my own via mosquitto

I’ve been using the excellent cloudmqtt since my early days getting to know MQTT. It’s been flawless except for about 3-4 times this month where it failed and I had to contact cloudmqtt support. Now I have to praise the support team as they did an excellent job very quickly, but the few faults made me think it was time to get myself my own broker.

In addition to going away from potential third party failures, it would allow me to keep controlling my devices should I have any internet access issues.

So I followed this page to set up mosquitto on my server.

Once done, I didn’t want to just switch everything over from cloudmqtt to mosquitto as I have quite a few devices to connect to cloudmqtt, some less accessible than others. I therefore created a bridge between my mosquitto and cloudmqtt to get the best of both worlds.

This was done by a new mosquitto config in the` /etc/mosquitto/conf.d/ directory`, I used cloudmqtt.conf (it can be any name as long as it ends with .conf so mosquitto will read it) with the following info:

connection cloudmqtt
address <Cloudmqtt Server>:<Cloudmqtt Port>
remote_username <Cloudmqtt User>
remote_password <Cloudmqtt Password>
clientid <Cloudmqtt user>
try_private false
start_type automatic
topic # both

All I then had to do was to point my Home-Assistant config to my own mosquitto broker.

Et voilà !


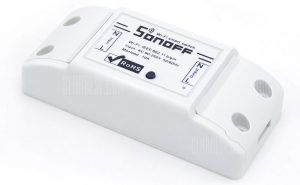
Sonoff Basic

I found this cheap smart WiFi switch on one of my favourite Chinese sites: the Sonoff Basic:

Sonoff Basic

Sonoff Basic

And I thought: for a fiver, I’m not risking much, and it can supposedly be re-flashed with MQTT which I’ve grown found of recently (see Smart Christmas Baubles or Back-lit House Number if you want to know why).

Once received, I saw that indeed there was a header that could be used to flash the firmware. After a bit of search and from some of my readings on the Home-Assistant community site, I settled on the Tasmota firmware.

Now I have to say, at first the Tasmota Github website is quite daunting and complex, bit of a case of too much information kills information, but I eventually managed to get through it.

As I’m using Arduino IDE, I’ll trace the steps I had to follow in case someone else like me is a bit stuck.

First of all, I had to solder header pins on the Sonoff board to connect it to a PC and upload the new firmware. You’ll find everything you need to know in here

Then there were a few things that I had to do aside from downloading the code off Github. Now I have to plea guilty a bit as I simply downloaded the latest version and tried straight away. I say “guilty a bit” as it wasn’t obvious at first that there were more steps to follow when using Arduino IDE. So it’s worth following them else you may get the same error as I did: `MQTT_MAX_PACKET_SIZE is too small in libraries/PubSubClient/src/PubSubClient.h, increase it to at least 1000`

So here is the info: Arduino IDE

Once all that is done, flashing is a bit of a breeze (though I had to swap the RX and TX connectors on my 3.3V FTDI USB-to-Serial Programmer else it would fail to connect)

Once flashed, it was very easy to add it to Home-Assistant, especially when following info from the Github

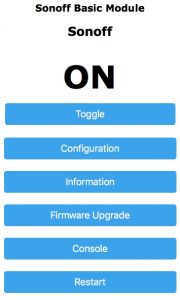
Best of all is the control page when browsing to the Sonoff’s IP address:

Tasmota

Tasmota

I will definitely get more of these switches at this price.

My next project will be to add a DHT12 to it as it’s possible to wire one directly to the GPIO14 (on the header so easy) to add temperature and humidity data…