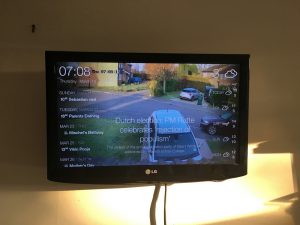
Now that I’ve upgraded the living room TV, I’ve moved my old 42” Plasma into our bedroom and I’m now left with a spare 22′ LCD TV.
Until now we had an old school paper wall calendar, mainly for birthdays and anniversaries, but let’s be honest we don’t look at it that often as it’s pretty much static (albeit with the monthly page flip)
I’ve stumbled upon DAKBoard and decided to repurpose my old tv into an interactive wall Calendar.
It’s free to sign up and create your own dashboard. I set up a family calendar in Google, set my location for the weather, and changed the picture setting to pull the live feed from my CCTV.
First I bought a Raspberry Pi Zero W as the “brain” of the new calendar. It would really only be opening the DAKBoard site and that’s pretty much all. No need for a big Raspberry Pi.
Then I installed Raspbian Jessie on it, mounted it so I could edit the WiFi settings thanks to David Maitland’s post. (I have no micro USB to USB adapter so no way of interacting with the Raspberry Pi other than via WiFi, which needs setting up manually).
Once connected to WiFi, I SSH’ed on it to setup the usual VPN (I use TightVNC, not the built in VNC server) and Samba.
Now it’s time to set up DAKBoard to open automatically at startup:
- Edit /home/pi/.config/lxsession/LXDE-pi/autostart and add this line. (replace ########### with the key from DAKBoard under Account):
@chromium-browser --disable-session-crashed-bubble --disable-infobars --incognito --kiosk http://dakboard.com/?p=###########
- install unclutter to hide the mouse:
sudo apt-get install unclutter
- Disable screen blanking so the TV always shows the dashboard:
sudo nano /etc/lightdm/lightdm.conf
insert the below line in the [SeatDefault] block:
xserver-command=X -s 0 dpms
- Disable the screensaver
- I then use DomotiGa and one of my LightWaveRF sockets to switch the TV on and off based on motion detection on my PIR
In the future I might look into dismantling the TV to get it to fit into a custom frame as per this instructable
[17th March 2017]
If you also plan on using VNC, there’s a chance that DAKBoard launched on the VNC display and not the HDMI display. If that’s the case, stop VNC from starting automatically. With my setup I set:
sudo systemctl disable [email protected]
(see this post for more info on how to setup TightVNC)
Then I simply added a line in /home/pi/.config/lxsession/LXDE-pi/autostart :
@nohup vncserver :1

