Category Archives: DomotiGa

CurrentCost Script

Until now I used DomotiGa to get the date off my CurrentCost EnviR energy sensor.

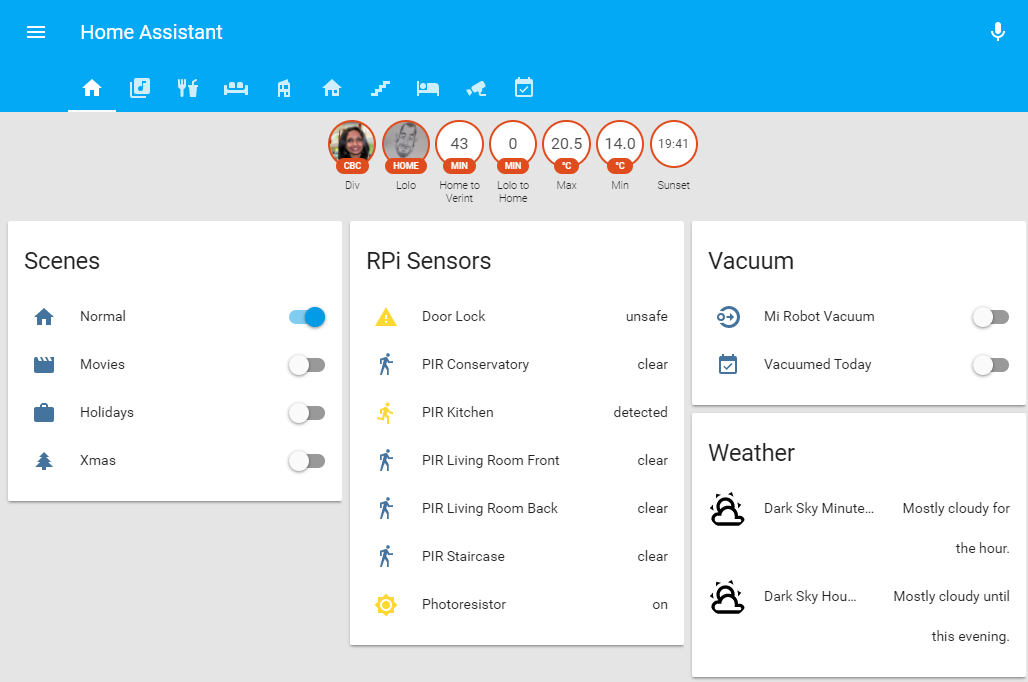
Since I’ve moved all my automations to Home-Assistant, the only bit that was not supported by HA was the CurrentCost device. I didn’t want to run DomotiGa just to get the data off the EnviR and then send it to HA via MQTT.

I’ve finally finished a script thanks to Robin Wilson that gets the EnviR data from the serial port and sends it to HA. DomotiGa can now truly rest in peace.

The final script is this one:

#!/usr/bin/python
# -*- coding: utf-8 -*-

import untangle
import serial
import json, requests, simplejson

def get_data(port='/dev/ttyUSB1', verbose=False):
	"""port: the port that the CurrentCost meter is attached to. Something like /dev/ttyUSB0 or COM1
	Returns:
	(sensor, temperature, usage), with sensor as the number of the interface a device is assigned to, temperature in degrees C, and usage in Watts
	"""
	ser = serial.Serial(port, 57600)
	xmldata = ser.readline()
	if verbose:
		print(xmldata)
	ser.close()
	p = untangle.parse(xmldata)
	temperature = float(p.msg.tmpr.cdata)
	watts = int(p.msg.ch1.watts.cdata)
	sensor = int(p.msg.sensor.cdata)
	return [sensor, watts, temperature]

def HA_API_State(Device_Id, Value, Unit):
	#https://home-assistant.io/developers/rest_api/#post-apistatesltentity_id
	url = "http://192.168.0.24:8123/api/states/" + str(Device_Id) + "?api_password=SECRET" 
	data={"state":"" + str(Value) + "", "attributes": {"unit_of_measurement": "" + str(Unit) + ""}}
	headers = {'Content-type':'application/json', 'Accept-Encoding': 'text/plain', 'Accept': 'text/plain'}
	r = requests.post(url, data=json.dumps(data), headers=headers)
	c = r.content
	result = simplejson.loads(c)

Temperature = 0
Sky = 0
Dehumidifier = 0
Total = 0

while(True):
	try:
		Temp = get_data()
		#print Temp[0]
		if (Temperature <> Temp[2]):
			print "Temperature: %s" % Temp[2]
			Temperature = Temp[2]
			HASS_API_State("sensor.CurrentCost_Temperature", Temperature, "°C")
		if (Temp[0] == 1):
			if (Total <> Temp[1]):
				print "Total: %s" % Temp[1]
				Total = Temp[1]
				HASS_API_State("sensor.CurrentCost_Power", Total, "Wh")
		if (Temp[0] == 2):
			if (Dehumidifier <> Temp[1]):
				print "Dehumidifier: %s" % Temp[1]
				Dehumidifier = Temp[1]
				HASS_API_State("sensor.Dehumidifier_Power", Dehumidifier, "Wh")
		if [Temp[0] == "9"]:
			if (Sky <> Temp[1]):
				print "Sky: %s" % Temp[1]
				Sky = Temp[1]
				HASS_API_State("sensor.CurrentCost_Sky", Sky, "Wh")
			
	except:
		pass


Goodbye DomotiGa, Long Live Home-Assistant

Following what I think is due to a general OS update, SmartVISU no longer connects to DomotiGa. I’ve tried to fix it, but I’ve thought for a while now to transfer everything over to Home-Assistant since support for IoT devices is much better and update are a lot more frequent

So I’ve finally taken the plunge. One of the main hubs that was used in DomotiGa was the RFXTrx433 Transceiver. I’ve disconnected it from DomotiGa and added it to Home-Assistant. I’ve spend the best part of 2 weekends and several weekday evenings recreating the devices and events that were in DomotiGa.

Home-Assistant Main Page

Home-Assistant Main Page

There’s still a lot of work to be done, but I’ve done the most important bits. I’ve also broken down the content on several pages unlike cramming almost everything in one page like I did in SmartVISU.

I’ve also used this an opportunity to save my config to GitHub for back up and in case it helps someone else.

The only thing I’ll be missing as not built-in is the data from my CurrentCost Sensors, but I’ll be running a light version of DomotiGa to send that data to my Home-Assistant setup.


LED Strip Lights

For a while now I’ve been wanting to add some LED Strips to my setup.

I wanted to get colour changeable strips that I could remotely control via DomotiGa.

I ended up getting 2 controllers based on the customisable H801 chip from AliExpress:

H801

H801

The downside is that I needed an Android Phone to set it up (Connect to my WiFi network), but once done, I no longer need the Android Phone.

In the future I’ll update the firmware to customise it and make it more secure, but for now it works relatively easy.

With advice taken from this post, I managed to create a simple script to send commands to the controller:

sendip -p ipv4 -is 192.168.4.15 -p udp -us 30978 -ud 30977 -d 0xfbeb000000000079979d00 -v 192.168.4.131
  • The first IP address is the address the command is sent from
  • The second IP address is the address of the H801 controller
  • The actual command is made of several parts: 0xfbeb 0000000000 79979d 00:
    • 0xfbeb is constant
    • Next come the hex values for the colours R G B W1 W2 (0000000000)
    • Then comes part of the controller’s MAC Address, in reverse order. The MAC Address is 18:fe:34:9d:97:79
    • The last bit (00) is again constant

This simple method allows me to easily switch the strip on and off and change its colour, and the results are quite impressive:

LED Strip Under TV Cabinet

LED Strip Under TV Cabinet

LED Strip Staircase

LED Strip Staircase


Because I have 2 controllers, I wanted to use a single script and parse as an argument the controller number that I wanted to communicate with.

The end result is the below script:

#!/usr/bin/python
# -*- coding: utf-8 -*-

import time
import sys
import subprocess

LEDStripBase="echo PASSWORD | sudo -S sendip -p ipv4 -is 192.168.0.24 -p udp -us 30978 -ud 30977 -d 0xfbeb"
LEDStrip1="000063509900 -v 192.168.0.40 > /dev/null"
LEDStrip2="000091559900 -v 192.168.0.41 > /dev/null"
# Kill the Xmas script if running
cmd="echo PASSWORD | sudo -S pkill -9 -f LEDStripXmas"
ps = subprocess.Popen(cmd, shell=True)
time.sleep(0.1)

if(len(sys.argv[2])==1):
	MyParam2 = "0" + hex(int(sys.argv[2]))[2:]
else:
	MyParam2 = hex(int(sys.argv[2]))[2:]

if(len(sys.argv[3])==1):
	MyParam3 = "0" + hex(int(sys.argv[3]))[2:]
else:
	MyParam3 = hex(int(sys.argv[3]))[2:]

if(len(sys.argv[4])==1):
	MyParam4 = "0" + hex(int(sys.argv[4]))[2:]
else:
	MyParam4 = hex(int(sys.argv[4]))[2:]

try:
	if(sys.argv[1] == '1'):
		cmd = LEDStripBase + MyParam2 + MyParam3 + MyParam4 + LEDStrip1
		ps = subprocess.Popen(cmd, shell=True)
	if(sys.argv[1] == '2'):
		cmd = LEDStripBase + MyParam2 + MyParam3 + MyParam4 + LEDStrip2
		ps = subprocess.Popen(cmd, shell=True)

except:
	pass

Note: I only soldered the RGB and Vcc pins as I’m not looking to use the white channels, hence the hard coded 0000 in the above script

All I need to do now to change the colour [to purple on the 1st controller) is to call the script as follows:

LEDStrip 1 255 0 255


Now to take it to the next level, I created a separate script to slowly run through the colour spectrum. I mainly run it at Christmas so called it LEDStripXmas.py (hence the command in previous script to kill this one if running):

#!/usr/bin/python
# -*- coding: utf-8 -*-

import time
import sys
import subprocess

LEDStripBase="echo PASSWORD | sudo -S sendip -p ipv4 -is 192.168.0.24 -p udp -us 30978 -ud 30977 -d 0xfbeb"
LEDStrip1="000063509900 -v 192.168.0.40 > /dev/null"
LEDStrip2="000091559900 -v 192.168.0.41 > /dev/null"

colors=[255,0,0]
while(True):
	# Cycle through RGB Spectrum
	colors[0]=255
	colors[1]=0
	colors[2]=0
	for decColour in range(0,3,1):
		if(decColour == 2):
			incColour = 0
		else:
			incColour = decColour + 1
		for i in range(0,255,1):
			colors[decColour] = colors[decColour] -1
			colors[incColour] = colors[incColour] +1
			R = hex(colors[0])[2:]
			if(len(R)==1):
				R = "0" + R
			G = hex(colors[1])[2:]
			if(len(G)==1):
				G = "0" + G
			B = hex(colors[2])[2:]
			if(len(B)==1):
				B = "0" + B
			if(sys.argv[1] == '1'):
				cmd = LEDStripBase + R + G + B + LEDStrip1
			else:
				cmd = LEDStripBase + R + G + B + LEDStrip2
			ps = subprocess.Popen(cmd, shell=True)
			time.sleep(0.1)

For the below movie, I’ve reduced the wait time (normal cycle takes about 1 min)

I then added the strips as devices in DomotiGa.

They are added as virtual devices, with Value1 being the strip’s status (on|off) and values 2,3,4 carrying the decimal value of the R G B colours respectively:

LED Strips - DomotiGa

LED Strips – DomotiGa

Then all I had to do is to call an action when one of the values of the device changes:

LEDStrip.py 1 <$188|2$> <$188|3$> <$188|4$>

And finally in SmartVISU I added a device:

LED Strip SmartVisu

LED Strip SmartVisu

Clicking on the colour brings the colour picker:

ED Strip SmartVisu Colour Picker

ED Strip SmartVisu Colour Picker


Syncing Home-Assistant.io and DomotiGa

Having tried Home-Assistant I can see how it can be really powerful once setup (and that’s probably where the issue lies, configuration is too much code driven with no UI at all).

However there are devices that are not yet supported by Home-Assistant (e.g. CurrentCost) and in addition, I can’t have both Home-Assistant and DomotiGa connected to my RFXTrx.

This means I’m looking to use both platforms and find a way to get them to talk to each other.
I already know how to send commands/updates to DomotiGa via JSON-RPC so that will be my first approach.

I’ve created a simple shell command that I use to update devices in DomotiGa:

shell_command:
  set_domotiga: curl -sS -X POST -H "Content-Type:application/json" -H "Accept:application/json" -d '{"jsonrpc":"2.0", "method":"device.set", "params":{"device_id":{{device_id}}, "valuenum":"{{valuenum}}", "value":"{{value}}"}, "id":122}' 192.168.0.24:9090

then in my automations, I call this function with the correct parameters. See below example for my Nest Thermostat (virtual) Device on DomotiGa:

- alias: Update Nest Status
  trigger:
    - platform: state
      entity_id: sensor.hallway_thermostat_hvac_state
  action:
    - service: shell_command.set_domotiga
      data_template:
        device_id: 122
        valuenum: 2
        value: '{{states.sensor.hallway_thermostat_temperature.state}}'

I’ve also tried to install Home-Assistant on my Raspberry Pi as I do like the Web interface, but it’s overkill and take too much overhead when I only need to monitor my GPIO ports. My own script is better in that effect.


Panasonic Smart TV

I’ve finally upgraded my TV. My previous 42” Plasma was very nice, but only HD ready (so 720p) and not smart.

I’ve now got a 4K 58” Panasonic TX58DX700B which has the advantage of having a network interface.

Panasonic Viera TX58DX700B

Panasonic Viera TX58DX700B

And the bonus is that there is already a plugin in DomotiGa that supports Panasonic Viera TVs.

This means I can now receive the mute status (on/off) and the TV volume, but more important I also get the TV status (on/off) and I can switch off the TV from DomotiGa.

This is very handy for my home automation, i.e. dim the lights when the TV in on, and don’t switch the lights off if there is no motion detected on the PIRs AND the TV is on.


Nest Thermostat

My old “dumb” thermostat packed up while doing some redecorating, so I upgraded to a smart one: the Nest Thermostat:

Nest Thermostat 3rd Gen

Nest Thermostat 3rd Gen

One of the cool features of this thermostat is that it can be remotely controlled via the web (http://home.nest.com) or via an app on a smart phone.

Now what would be even better is if I could integrate this with the rest of my home automation setup. And so I went looking online for ways to connect with the intent of 1) extracting data such as temperature and humidity and 2) control the target temperature remotely from DomotiGa.

My first connection attempt was via gboudreau’s unofficial API on GitHub

Although it works perfectly fine, there is some sort of limit on the number of times you can poll the info and eventually the connection gets closed.

I then looked at Google’s official API, and I’ve even followed their tutorial and managed to connect to my Nest, but it’s a little bit too much out of my area of expertise, plus I think the Google codelabs example is intended to be ran on mobile devices rather than a simple web interface. So for now I’ve parked this project for later.

[26th Jan 2017]

Edit: home-assistant.io supports Nest natively, using Google Nest official API. I’m currently working through integrating my Nest with home-assistant.io and get it to talk to DomotiGa. Watch this space.


Google TTS is dead. Long Live Voice RSS

Google changed once again the way their translate_TTS service works 🙁

Having trawled the interweb for an answer, having even signed up for an API key on the new Google Translate API V2, it’s just become impossible to download the text-to-speech audio files.

I have tried various free TTS options – see previous post here – and none were really “fit for purpose” as they really sounded metallic computerised voices, but I’ve just found Voice RSS.

Now Voice RSS is really nowhere as good as Google’s TTS quality, but in the grand scheme of things, it’s probably the next best thing, especially as it can be used almost as a direct replacement using wget.

You’ll have to sign up for an API key first, but provided you need less than 350 requests / day (with each request being smaller than 100kb), it’s free 🙂

The command goes as follows:

http://api.voicerss.org/?key=[your API Key]&hl-en-gb&r=1&f=48khz_16bit_stereo&src=hello+world

It’s also a bit slower than Google to return the audio files so I’ll probably review my commands to do the complete download and play them all one after the other.


Smart Letterbox

My letterbox is on the outside door, in the porch, behind the front door. So when the postman comes and delivers, I don’t always notice it. It also means that I will sometime open the front door just to check if post has been delivered yet.

I was wondering, how can I make my letterbox smarter so it alerts me when post has been delivered? Answer: use a sensor designed for door/window security.

I therefore purchased a Home Easy Remote Control Magnetic Switch Unit (HE305) from http://wirelesshomes.co.uk/

Home Easy HE305

Home Easy Remote Control Magnetic Switch Unit HE305

The idea behind this is that when the 2 piece are away from each other, a signal is sent and captured by my RFXTrx Transceiver so I can add rules in DomotiGa.

To achieve this I purchased a cheap letterbox from B&Q that I fitted in the internal part of the porch door, which gets lifted when post is pushed through:

Letterbox

Letterbox

Now when post is delivered, an audio announcement is played on the speakers and an email is sent. I also log each entry to keep track of delivery times, just because I can 😎

Important Note: Even though this is an Home Easy device, the AC protocol needs to be enabled in RFXCom Commander for the signal to be picked up in DomotiGa.


Smart Doorbell

I’ve now changed the “dumb” doorbell with a “smart” one; the previous doorbell was a standard push button with a wireless receiver that plugs on a socket.

Problems:

  • There was only 1 receiver
  • The receiver was not a pass-through, meaning it would occupy a socket on the wall
  • There was no way of adjusting the ringer volume

I’ve purchased a Byron SX-20T kit which resolves the above issues as there are 2 receivers in the kit and they are both pass-through so I don’t lose a socket. They also both have a rotating control button to adjust the volume (handy for the one that’s upstairs when our little one is sleeping)

Byron SX-20T

Byron SX-20T

But the best thing about it is that it uses the 433MHz frequency which is recognised by the RfxTrx433 so I can automate actions in DomotiGa when the doorbell is pushed, and here is what happens when someone does:

  1. Play the same tune as the receivers on the server’s speakers, effectively providing the equivalent to a 3rd receiver (sample tunes available here)
  2. Log the time and date the doorbell was pressed for future use (e.g. “Hey dear courier, nobody rang the bell when you tried to deliver that parcel and left it outside for someone to steal it, and I can prove it”)
  3. Send an automated email to inform me that a visitor passed by.

What’s Next?

I’m planning on adding some “proper” CCTVs to the house – the ones I had before were cheap and not so cheerful so  I got rid of them. When I do, I can then send a picture of the CCTV with the notification email.


Google Text-To-Speech

[8th Feb 2016] Note: this article is now obsolete, please check my newer article on Voice RSS


For some time I was using Google’s free Text-To-Speech  which provides a very simple way of converting text into speech:

http://translate.google.com/translate_tts?tl=en&q=Hello+world!

This enabled me to be greeted each morning with the weather forecast for the day.

However early August Google changed their website and forced users to enter a captcha to stop automated access, with the message “Our systems have detected unusual traffic from your computer network. This page checks to see if it’s really you sending the requests, and not a robot.“.

Seeing as I was using this in bash / python scripts, TTS would no longer work.

While looking for alternative (free) solutions, I tried various TTS solutions including epeak, festival, pico2wave, and Mbrola voices, but it was far off the quality provided by Google’s TTS engine.

Anyhow, not giving up, and after a lot of digging, I found the solution, I just had to add more parameters to Google URL. I’ve added the new link below with the new parameter in bold below. Also note the revised parameter for the translated language:

http://translate.google.com/translate_tts?ie=UTF-8&tl=en_GB&total=1&idx=0&client=t&q=Hello+world!

Now to call this from a bash script, use the below commands:

wget -q -U "Mozilla/5.0" -O output.mp3 "http://translate.google.com/translate_tts?ie=UTF-8&tl=en_GB&total=1&idx=0&client=t&q=Hello+World!"
mpg123 -q output.mp3

Notes:

  • Google will not accept access unless it thinks it’s a browser, to we have to use wget to output the sound into an mp3 using the -U “Mozilla/5.0” command.
  • Google has a limit of 100 characters per request

Now all I have to do in DomotiGa is to create an event triggered on a movement sensor with a condition based on hour of the day (typically 04:00 – 12:00), ensuring it will only run once in a set period (8h). This way, as soon as I enter the living room in the morning, I get greeted with the weather forecast for the day 😎
I use a free wunderground account to extract weather data from an xml file and achieve the above.