Category Archives: DomotiGa

New version of DomotiGa & SmartVISU = New Plots

DomotiGa was upgraded over the Easter weekend as well as a new version of SmartVISU bringing an improvement on plots.

Whereas before the plot function would pull the complete list of values to build the chart (and therefore would just time out, especially with my CurrentCost power consumption as it updates every 5 sec), the revised version has a new parameter for the maximum number of points to return.

This means I can now plot ANY of my devices’ values:

SmartVISU Plots

SmartVISU Plots

The easiest way to know where to put that new value (mine’s set to 2500 as any higher seems to time out) is to open widgets\plot.html

/**
* A simple widget for plotting charts
*
* @param unique id for this widget
* @param series of item/s. More item/s in array form: [ item1 , item2 ]
* @param the mode: 'avg', 'sum', 'min', 'max'
* @param the minimum time (x-axis): '1h', '2h'... (duration-format)
* @param the maximum time (x-axis): '', '1h', '2h'... (duration-format, default: now)
* @param the minimum y-axis (optional)
* @param the maximum y-axis (optional)
* @param the number of points in the period
* @param label/s for each series (optional)
* @param color/s for each series e. g. '#f00' for red (optional, default: sutiable for design)
* @param type/s for each series: 'line', 'stair', 'spline', 'area', 'areaspline', 'column' (optional, default 'line')
* @param title/s for the x-axis and y-axis
* @param minimum time while zooming in sec (optional, duration-format)
* @param number of samples (points) (optional, default 100)
*
* @see misc/fundamentals#Array-Form
* @see misc/fundamentals#Duration-Format
*/


MCE Remote: getting lazier by the day

Now that I’ve set up Plex on my server and install Plex Home Theater on my PC, I can play movies on my PC and watch them on the TV in the living room (via SPDIF & HDMI cables).

Trouble is Plex Home Theater is designed to be controled by a remote and mice are not supported.

I’ve therefore purchased an MCE remote from Amazon. The beauty of this remote is that 1) it’s ridiculously cheap (the price was £6.95 when I bought it) and 2) it’s natively supported by Windows, no need for bloat software or drivers.

Emprex 3009ARF Wireless MCE Remote Control

Emprex 3009ARF Wireless MCE Remote Control

1 tiny annoyance though, the green Windows button is set up to launch Windows Media Center and there doesn’t appear to be a setting to change this.
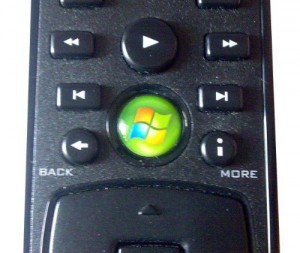
MCE Windows Button

MCE Windows Button

After a bit of digging online, I found out that the green button launches C:\Windows\ehome\eshell.exe

So it should then be fairly easy to replace this file and put my own script instead right?

Wrong! For some reason Windows has this file set up in  such a way that you cannot delete or rename it. This is the way to go round the limitation:

  1. Navigate to C:\Windows\ehome\
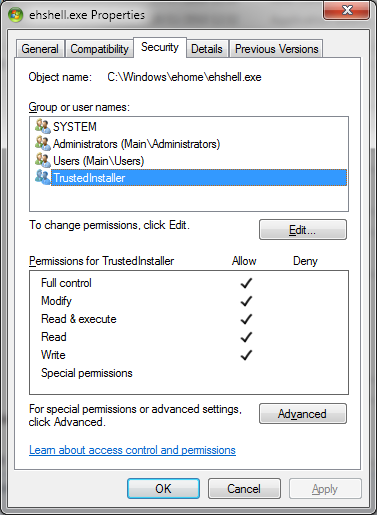
  2. Right-click on eshell.exe > Properties
  3. Click on the Security tab
  4. By default, TrustedInstaller has all rights and you cannot change the rights for other groups / users

    eshell Properties

    eshell Properties

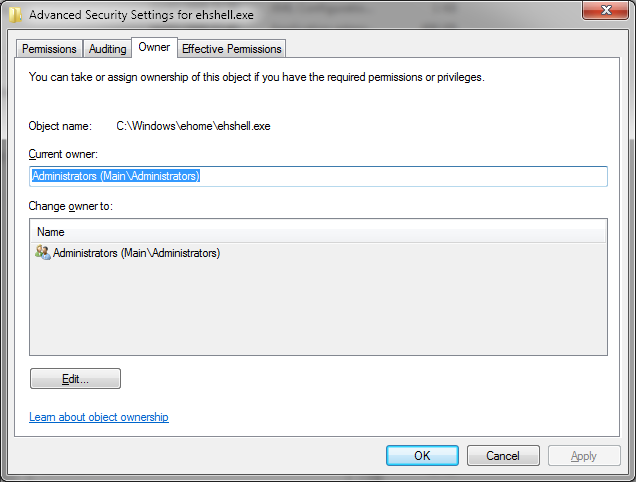
  5. Click on Advanced > Owner tab > Edit.

    eshell Owner

    eshell Owner

  6. Select the new Owner (your account) and Accept > OK
  7. Now select your user and enable Full Control

You can now rename eshell.exe and use a different program instead.

I have used AutoHotKey to write a script which would launch Plex Home Theater instead of Windows Media Center:

#NoEnv ; Recommended for performance and compatibility with future AutoHotkey releases.
; #Warn ; Enable warnings to assist with detecting common errors.
SendMode Input ; Recommended for new scripts due to its superior speed and reliability.
SetWorkingDir %A_ScriptDir% ; Ensures a consistent starting directory.
run, "C:\Program Files (x86)\Plex Home Theater\Plex Home Theater.exe"


Now why stop there?

I would still need to get to the PC and manually set the default audio output to SPDIF, and I have to use my HomeEasy remote to activate a Movies mood scene in DomotiGa (I’ve synced a button with my RFXTrx433 so DomotiGa recognises the remote as a device).

So I created another AuthoHotKey script which constantly runs in the background and adjusts the default audio output depending on whether Plex Home Theater is running or not. And it also executes a Python script which will send a command via JSON-RPC to update a device on  DomotiGa.

Here are the scripts:

#NoEnv ; Recommended for performance and compatibility with future AutoHotkey releases.
; #Warn ; Enable warnings to assist with detecting common errors.
SendMode Input ; Recommended for new scripts due to its superior speed and reliability.
SetWorkingDir %A_ScriptDir% ; Ensures a consistent starting directory.

MCE_Win = 0
DetectHiddenWindows, On
while(1)
{
winwait, Plex Home Theater
winminimize, Plex Home Theater
run, "C:\Program Files\Python 3.5\python.exe" "C:\Program Files\Python 3.5\MoodSceneMoviesOn.py"
; Sets audio out to SPDIF
runwait, "E:\Docs Communs\G12.exe"
winactivate, Plex Home Theater
winmaximize, Plex Home Theater
MCE_Win = 1
sleep, 5000
while(MCE_Win)
{
IfWinNotExist, Plex Home Theater
MCE_Win = 0
sleep, 2000
}
run, "C:\Program Files\Python 3.5\python.exe" "C:\Program Files\Python 3.5\MoodSceneMoviesOff.py"
; Sets audio out to PC Speakers
run, "E:\Docs Communs\G8.exe"
}


import requests, subprocess
import json, json as simplejson

def Domotiga_API(Method, Device_Id, Valuenum, Value):
url = "http://192.168.0.24:9090" 
data={'jsonrpc': '2.0', 'method': '' + Method + '', 'params': {'device_id': Device_Id, 'valuenum': '' + str(Valuenum) + '', 'value': '' + str(Value) + ''}, 'id': 1}
headers = {'Content-type': 'application/json', 'Accept-Encoding': 'text/plain', 'Accept': 'text/plain'}
r = requests.post(url, data=json.dumps(data), headers=headers)
c = r.content
result = simplejson.loads(c)
#print result

Domotiga_API("device.set", 21, 1, "On")

Now I simply need to sit on the sofa and press the green button, and the following happens “automatically”:

  • Plex Home Theater starts
  • Default audio set to SPDIF on my Windows PC so the sound goes to the amplifier
  • Speakers connected to the server  announce “Mood Scene: Movies, Activated
  • The lights in the kitchen and living room turn off
  • A red light for the right ambiance gets turned on

Isn’t life beautiful? 🙂

[Edit – 20/05/2016] This doesn’t seem to work under Windows 10. MCE is technically dead under Windows 10, yet I can still start MCE manually and the remove appears to still send some of the commands, only nothing happens when pressing the MCE button. I’ll share more once I have an update


Tracking free space on the ZFS Drive

Now that I’ve set up 2 drives on a RAID like configuration using ZFS, I want to see how much space I have left on the drive.

Because I’m using ZFS, it is not recognised as a standard drive in Ubuntu and as such it’s not possible to use standard Ubuntu utilities to keep track of disk usage.

You can use the following command to check the status of your ZFS pool:

sudo zpool list

However this is somewhat a manual action which requires opening a terminal. Since I use DomotiGa extensively, I wanted to display the free space on the ZFS device (already displayed thanks to the HDDTemp plugin).

I ended up with this python script:

#!/usr/bin/python
# -*- coding: utf-8 -*-

import requests, subprocess
import json, json as simplejson

def Domotiga_API(Method, Device_Id, Valuenum, Value):
url = "http://localhost:9090" 
data={'jsonrpc': '2.0', 'method': '' + Method + '', 'params': {'device_id': Device_Id, 'valuenum': '' + str(Valuenum) + '', 'value': '' + str(Value) + ''}, 'id': 1}
headers = {'Content-type': 'application/json', 'Accept-Encoding': 'text/plain', 'Accept': 'text/plain'}
r = requests.post(url, data=json.dumps(data), headers=headers)
c = r.content
result = simplejson.loads(c)
#print result

p = subprocess.check_output(['sudo', '-S', 'zpool', 'list', '-o', 'alloc'], shell=False)
q = subprocess.check_output(['sudo', '-S', 'zpool', 'list', '-o', 'size'], shell=False)
c = subprocess.check_output(['sudo', '-S', 'zpool', 'list', '-o', 'cap'], shell=False)
mystring= p[6:11] + "/" + q[6:11]
Domotiga_API("device.set", 65, 2, mystring.strip())
Domotiga_API("device.set", 66, 2, mystring.strip())
Domotiga_API("device.set", 65, 3, c[6:10].strip())
Domotiga_API("device.set", 66, 3, c[6:10].strip())

I then set up an even in DomotiGa which launches bash script every 5 min:

echo "password" | sudo -S ~/domotiga/shell/zfschecker.py

Replace password with your own sudo password of course.

Tada:

ZFS Disk Space

ZFS Disk Space


SmartVISU Plot Charts

With the release of DomotiGa v1.0.020, it is now possible to use SmartVISU plot charts directly instead of importing a 3rd party tool like HighCharts (see previous article about HighCharts).

Notes:

  1. Make sure you use the correct DomotiGa drivers for SmartVISU (you can get them here: io_domotiga.js and io_domotiga.min.js)
  2. If not yet done, you’ll also need to ensure you are tracking the value changes by enabling Log value history to database under the Options tab
  3. Name your device values correctly: the device name ideally has no spaces, the datasource name will be made of devicename_plotx where x is the device’s value (1 to 4). In my example, HDDRoot is the name, the Hard Drive’s temperature is in value1 so the datasource name is hddroot_plot1:

    datasource name

    datasource name

  4. Use this command in your SmartVISU page:
  5. {{ plot.period('plot1', 'HDDRoot_Plot1', 'avg', '1w', '', '', '', '', 'HDD Root', '#ff0', 'line', ['','°C'], '1h')}}
  6. Explanation of what each parameter means is provided by SmartVISU HERE

The result of my setup is this:

SmartVISU Plots

SmartVISU Plots

Note: I just added 2 hard drives to my server for storage and backup purposes (see this article), so there has not been enough time yet to track their temperature changes in the above charts.


Smart(er) Dehumidifier

So my dehumidifier is already somewhat smart: by using a Cresta TS34C Wireless Temperature & Humidity Sensor, and a HomeEasy Remote Controlled Socket, I can automatically switch the dehumidifier on when the humidity is too high.

Trouble is I’m getting lazy and simply rely on this automation and as a result I tend to forget that the dehumidifier tank will eventually fill up and then stop.

So taking it a step further, I’ve added a home-made Individual Appliance Monitor (IAM) with a spare Current Cost sensor which I plugged between the HomeEasy socket and the dehumidifier.  Check this post for how to make the sensor (same principle as for the Owl one).

Now with a simple event in DomotiGa, if the HomeEasy Socket is on but the power consumption is 0, it means the tank is full and an email is automatically sent.

Isn’t automated life beautiful? 🙂


OWL Individual Appliance Monitor

With a cheap OWL CM119 Energy Monitor, and thanks to an idea picked from pictures found on Flickr, I built my own appliance monitor:

OWL CM119

OWL CM119

Pictures from Flickr showing steps to create the monitor:

OWL_IAM_1 OWL_IAM_2 OWL_IAM_3

And this is what I ended up with:OWL_IAM_4

And with the benefit of communication via 433MHz and being supported by the RFXTrx433, I don’t even need to use the OWL base, I just needed to enable the Oregon Mode in DomotiGa to start receiving the data. (See RFXTrx433 post for instructions).

Very handy to automate tasks based on the status of an appliance…

So in DomotiGa, this is what I did to automate based on power consumption under Events:

  1. Trigger:
    1. Trigger Type: Device Lastseen
  2. Conditions:
      1. CInt(Dev_50_Value2) >20 (this is to cater for devices in standby mode, create another condition with <20 for the Off State. value may need to be amended)
  3. Events:
      1. Use the trigger and condition created above, and add your actions


Current Cost’s IAM

Having moved one of my PIR‘s in the living room to automate the lights in here too, I quickly realised there was a major flaw: when I watch the TV, I tend to move very little. This results in the lights turning off when I want them to stay on.

I had to find a better solution than waving my arms every 5 min or so to keep the lights on.

I found out Current Cost do IAMs or Individual Appliance Monitors. They look like this (I ended up with a European version with a couple of adapters to get it to work here in the UK):

Current Cost IAM

Current Cost IAM

Since my Current Cost Classic monitor did not support this, I bought a 2nd hand one that does from eBay: the EnviR:

Current Cost EnviR

Current Cost EnviR

The neat result is that the IAM, although not natively supported by DomotiGa (at the time of writing), is actually correctly detected since Current Cost use the same format on the serial port 🙂

It was then very simple to add an event in DomotiGa to check IF there is no motion detected on the PIR AND the power consumption of the TV is less than 20 watts (the TV uses about 12-14watts in standby), THEN I switch the light off.

SmartVISU - TV Monitor

SmartVISU – TV Monitor (screenshot from mobile interface)

For the record, the Current Cost returns a string, not a number, in the format ‘00000‘, so in DomotiGa I had to convert this to a number for my IF statement:

CInt(devicename_value2) < 20


Wireless Temperature & Humidity Sensor

During the winter months, I tend to use a dehumidifier, with a timer.

I recently “upgraded” the timer and replaced it with one of my HomeEasy Sockets, controlled remotely via DomotiGa.

However I was looking to take it to the next level by making the dehumidifier a bit smarter so it would only work when the relative humidity is too high.

I’ve therefore purchased a Cresta TS34C Wireless Thermo-Hygro Sensor (From HERE):

Cresta TS34C Wireless Thermo-Hygro Sensor

Cresta TS34C Wireless Thermo-Hygro Sensor

The data is received wirelessly via my RFXTrx433

I am currently logging the temperature and humidity levels in order to set Start and Stop times via DomotiGa. Looks to become as follows:

On: RH > 70%
Off: RH < 50%

This will also be done only within specific times during the day so I don’t get awaken at night by the dehumidifier of course.

And because there are 5 channels on the sensor, I can use more than 1 concurrently, so I have another sensor outside to replace the old DHT22 which is starting to show signs of age. It’s also placed in a better location as the sensor is wireless so the readings should be more accurate.


Sound & Text-To-Speech

I was looking to add sound to my DomotiGa installation so I could generate audio alerts and updates.
Since my server does not have any audio out socket, I’ve purchased some USB Speakers: Sweex 2.0 Speaker Set Purephonic USB Speakers:

Sweex 2.0 Speaker Set Purephonic USB Speakers

Sweex 2.0 Speaker Set Purephonic USB Speakers

There was only 1 glitch which took me a whole afternoon to sort. For some reason my user was not part of the audio group so I could not get any sound out.

I eventually realised this and sorted it with this command:

sudo adduser [user] audio

And to control the volume, I use this command:

amixer sset Master 50%


I have then recorded a few voice announcements using TTS (Text-To-Speech) that I can use with events such as:

  • “Alert: Front CCTV connection Lost”
  • “Alert: CurrentCost connection lost”
  • “Mood Scene: Movies, Activated”
  • and the geeky “Good Morning” 😎


Dimmable LEDs

The first LEDs I got to replace running expensive halogens were not the best. Although they were really bright (520 lumen) their angle was only about 30º and they didn’t dim that much. So it resulted in a darker room than with the old halogens (which were less bright at 400 lumen)

I got new sets of LEDs. This time I spent much attention to getting ones with a wide beam angle. One thing to note: even though they dim much more than the first ones I got, they still don’t dim all the way down to off like halogens would, probably down to about 30-40%. (They work also very well with the LightWaveRF switches that I use to control them)

I chose 4.5 Watt GU10 COB Bulb – Wide Beam Angle for the living room:

4.5 Watt GU10 COB Bulb - Wide Beam Angle

4.5 Watt GU10 COB Bulb – Wide Beam Angle

and 4 Watt GU10 LED Bulb – Wide Beam Angle for the kitchen:

4 Watt GU10 LED Bulb - Wide Beam Angle

4 Watt GU10 LED Bulb – Wide Beam Angle

Not only these are much cheaper to run than halogens (less than a 1/10), but because of their wide angle, they end up being actually much brighter too, even the kitchen ones which are only on 320 lumen (VS. 400 lumen for halogens). RESULT !